


Heat flux sensor installation: how to do it?
Performing a heat flux measurement is a powerful tool for gaining insights into thermal processes. However, using a suitable sensor for your specific measurement and installing it correctly to obtain accurate data is important. This article explores the dos and don'ts of heat flux sensor installation.
First, we briefly explain what heat flux is and what types of heat transfer exist. Second, we discuss multiple options for mounting heat flux sensors. Third, we explain why air gaps during the installation of heat flux sensors should always be avoided and how to avoid them. Fourth, we discuss the role of optical properties in installing heat flux sensors. Finally, two examples of heat flux sensor installation are highlighted.
What is heat flux?
Heat flux is the term used for energy transport through a surface. It is expressed in watts per square meter (W/m2). Heat fluxes are studied for various purposes, such as verifying thermal insulation's effectiveness, optimising cooling, and assessing energy-saving opportunities.
Three different heat transfer types exist: conduction, convection, or radiation.
Conduction occurs through solids. The transfer of heat through conduction depends on the dimensions of the solid and its thermal conductivity.
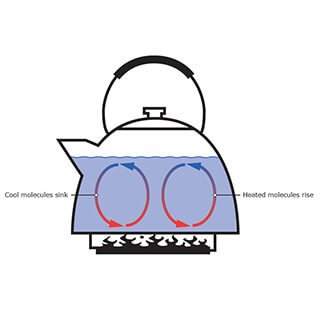
Convection occurs between a solid and a moving fluid or gas, for instance, from a wall to the air. The amount of heat transferred through convection varies with the flow rate. Higher flow rates result in higher heat flux.
Radiation occurs between all objects with a temperature greater than 0 K, such as from the sun to your body. Surface properties of the source and receiver play a significant role in radiative heat transfer, with a source with lower surface emission and a receiver with lower absorption resulting in lower heat fluxes.
For more information on heat flux, please refer to the article: What is heat flux?
Measure heat with a heat flux sensor
using silicone glue.
To measure heat through a surface, we use a heat flux sensor. There are many types of sensors, each with its own characteristics. When selecting a heat flux sensor, first look at the application. Second, determine how heat is transferred by conduction, convection, radiation, or a combination of these mechanisms. Third, look at the environmental conditions. Finally, decide how to measure the output signal (voltage, current, or digital). Knowing the application, transfer type, and environmental conditions allows you to choose the suitable sensor for the job.
To learn more about heat flux sensors, please read the article: Heat flux sensors: the latest technologies.
Mounting heat flux sensors
Mounting a heat flux sensor is easy, but it is important to ensure that it is mounted securely, regardless of the type of sensor. When sensors become loose, they produce unstable and unreliable measurements over time.
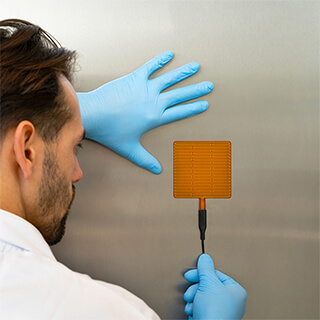
Depending on the application, there are different methods for mounting a heat flux sensor. Figure 1 shows one example. Later in the article, we discuss two more methods in detail: double-sided tape and a magnetic frame.
When selecting a mounting method, it is crucial to consider both the temperature range and the measurement duration. Table 1 summarises the available mounting options based on these two factors.
Table 1 Options for mounting heat flux sensors.
| Product | Duration | Rated temperature range (°C) | Functionality | Comments |
| powerstrip | temporary, easily removable | 15 to 40 | fixation and gap-filling | - |
| glycerine | minutes | to 120 | gap-filling only | - filler only for quick experiments - it is safe to use and easily dissolves in water |
| toothpaste | days | 40 | gap-filling only | - filler only - use with other fixation such as single-sided tape - water-based |
| double-sided tape | two weeks, removable | 40 | fixation and gap-filling | - |
| thermal paste | weeks | to 177 | gap-filling only | - filler only - use with other fixation such as single-sided tape - silicone oil-based |
| silicone glue | permanent | -45 to 200 | fixation and gap-filling | - most commercially available silicone glues are suitable |
| single-sided tape | temporary or permanent | -260 to 150 | fixation only | - fixation only - use with other fillers such as thermal paste |
| magnets | temporary or permanent | to 500 | fixation only | - on magnetic surfaces only - for sensors with optional ‘frame with magnet’ only in case using welded treads |
| tack welded threads | temporary or permanent | -260 to 1000 | fixation only | - for sensors with flanges - fixation only - use with other fillers such as silicone, graphite sheet material or cement |
| bolts | temporary or permanent | -260 to 1000 | fixation only | - for sensors with flanges - fixation only - use with other fillers such as silicone, graphite sheet material or cements |
| silicone gasket | temporary or permanent | to 200 | gap-filling only | - filler only - use with other fixation such as bolts or threads |
| graphite gasket | temporary or permanent | to 500 | gap-filling only | - filler only - use with other fixation such as bolts or threads |
| high-temperature cement | temporary or permanent | to 1400 | fixation and gap-filling | - |
Air gaps during installation
When mounting a heat flux sensor, avoiding air gaps between the sensor and the measured object is important. These gaps can create significant thermal resistance and increase response time. A general principle of heat flux measurement is that the thermal resistance of the sensor (including the gap) must be kept as low as possible. The higher it is, the less representative the measurement is of the undisturbed situation without a sensor.
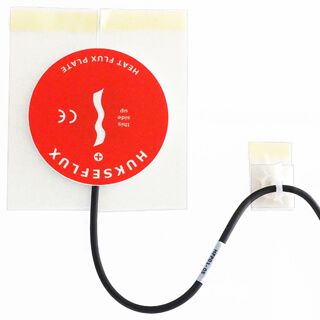
To illustrate this, let us consider a Hukseflux HFP01 sensor. This sensor has a thermal resistance value, also known as an R-value, of 70 x 10-4 (m2·K)/W. The R-value determines the resistance of an object to the transfer of heat. The higher this value, the slower heat transfers through the insulating material. During the installation of this sensor, an air gap of 0.05 x 10⁻³ m was created. The thermal conductivity of air is in the order of 0.02 W/(m·K). This means this gap has an R-value of 25 x 10-4 (m2·K)/W. In other words, an HFP01 sensor's R-value increases by approximately 35 % due to a small air gap. Using a typical glue filler of 0.05 x 10⁻³ m with a thermal conductivity around ten times higher than that of air, the thermal resistance is reduced to 2.5 x 10⁻⁴ (m2·K)/W. Therefore, the contribution to the thermal resistance of the HPF01 sensor reduces to about 3 %.
What to do about air gaps?
We can conclude that air gaps have a negative impact on the representativeness of heat flux measurements. But how can they be avoided?
First, you can use tapes, sheet material, glues, and cements to fill air gaps. Second, before installation, ensure that the surface where the sensor will be mounted is smoothed out. Finally, consider using flexible heat flux sensors, such as the Hukseflux FHF05 series or FHF06 sensors, for curved surfaces to prevent air gaps.
Optical properties
When a heat flux sensor is installed on a surface, heat transfer typically occurs through a combination of radiation and convection. To minimise thermal resistance for the convective part, the sensor's thermal resistance should be as low as possible. Additionally, for the radiative part, the optical surface properties of the sensor should accurately represent the surrounding area.
Moreover, remember that radiation is not only transmitted in the spectral range that humans can see (visible radiation) but also as non-visible far infrared (25-40 µm to 200-350 µm). So, in other words, what the eye sees in the visible range may be misleading in the infrared.
Example 1: installation of HFP01
using 2-sided tape.
The Hukseflux HFP01 heat flux sensor model is commonly used on walls to analyse their thermal resistance. For temporary installation, a thermal paste (usually silicone-oil-based) or a water-based paste (such as toothpaste) can fill the space between the sensor and the surface. However, for long-term use at a single location, double-sided tape is the recommended choice. This is because thermal paste tends to dry over time and loses effectiveness.
When using double-sided tape, ensure that the pieces of tape fit together seamlessly and cover the entire sensor area.
In Figure 2, the optical properties in the visible range do not match those of the surrounding wall. However, this is acceptable if the transfer of heat by visible radiation is insignificant.
Example 2: installation of IHF02

When exposed to temperatures above 150 ˚C, sensors such as the HFP01 cannot survive. For temperatures above 250 ˚C, the FHF series models are not suitable. In these cases, industrial heat flux sensors like the IHF02 are used to withstand temperatures of up to 900 ˚C and heat fluxes of up to 100 kW/m2.
The IHF02 features mounting flanges for easy installation using bolts or threads. Typically, bolts are combined with springs to ensure constant pressure over a wide range of temperatures and to avoid excessive pressure on the sensor. Air gaps are usually filled with gasket material or cements. Note that in Figure 3, the optical properties of the IHF02 and the surrounding metal match because their surfaces are both blank metals.
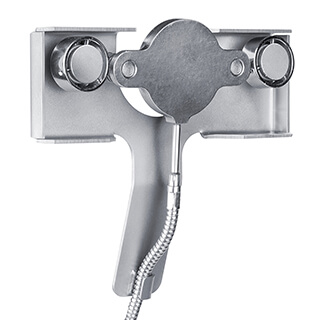
with an optional magnet frame.
For installation on magnetic surfaces, a magnet frame, as depicted in Figure 4, can be used for short-term or long-term installation if drilling or welding is not possible.
Conclusion
In conclusion, various methods exist to install a heat flux sensor onto a surface. It is important to take into account all the parameters involved in sensor installation, such as the duration of the measurement, the temperature range in which the measurement is being taken, the functionality of the mounting product, how to prevent and handle any air gaps, and the optical properties of the measurement surface’s surroundings.
If you need assistance installing your heat flux sensor on a specific surface, please don't hesitate to contact us.
Watch the video below to learn more about heat flux measurement.
Related to Heat flux sensor installation: how to do it?

5 recent heat flux applications; from smartwatches to mattresses
How to measure heat: temperature versus heat flux